Notice: Crystal Jewelers will be closed from July 28 through August 6.


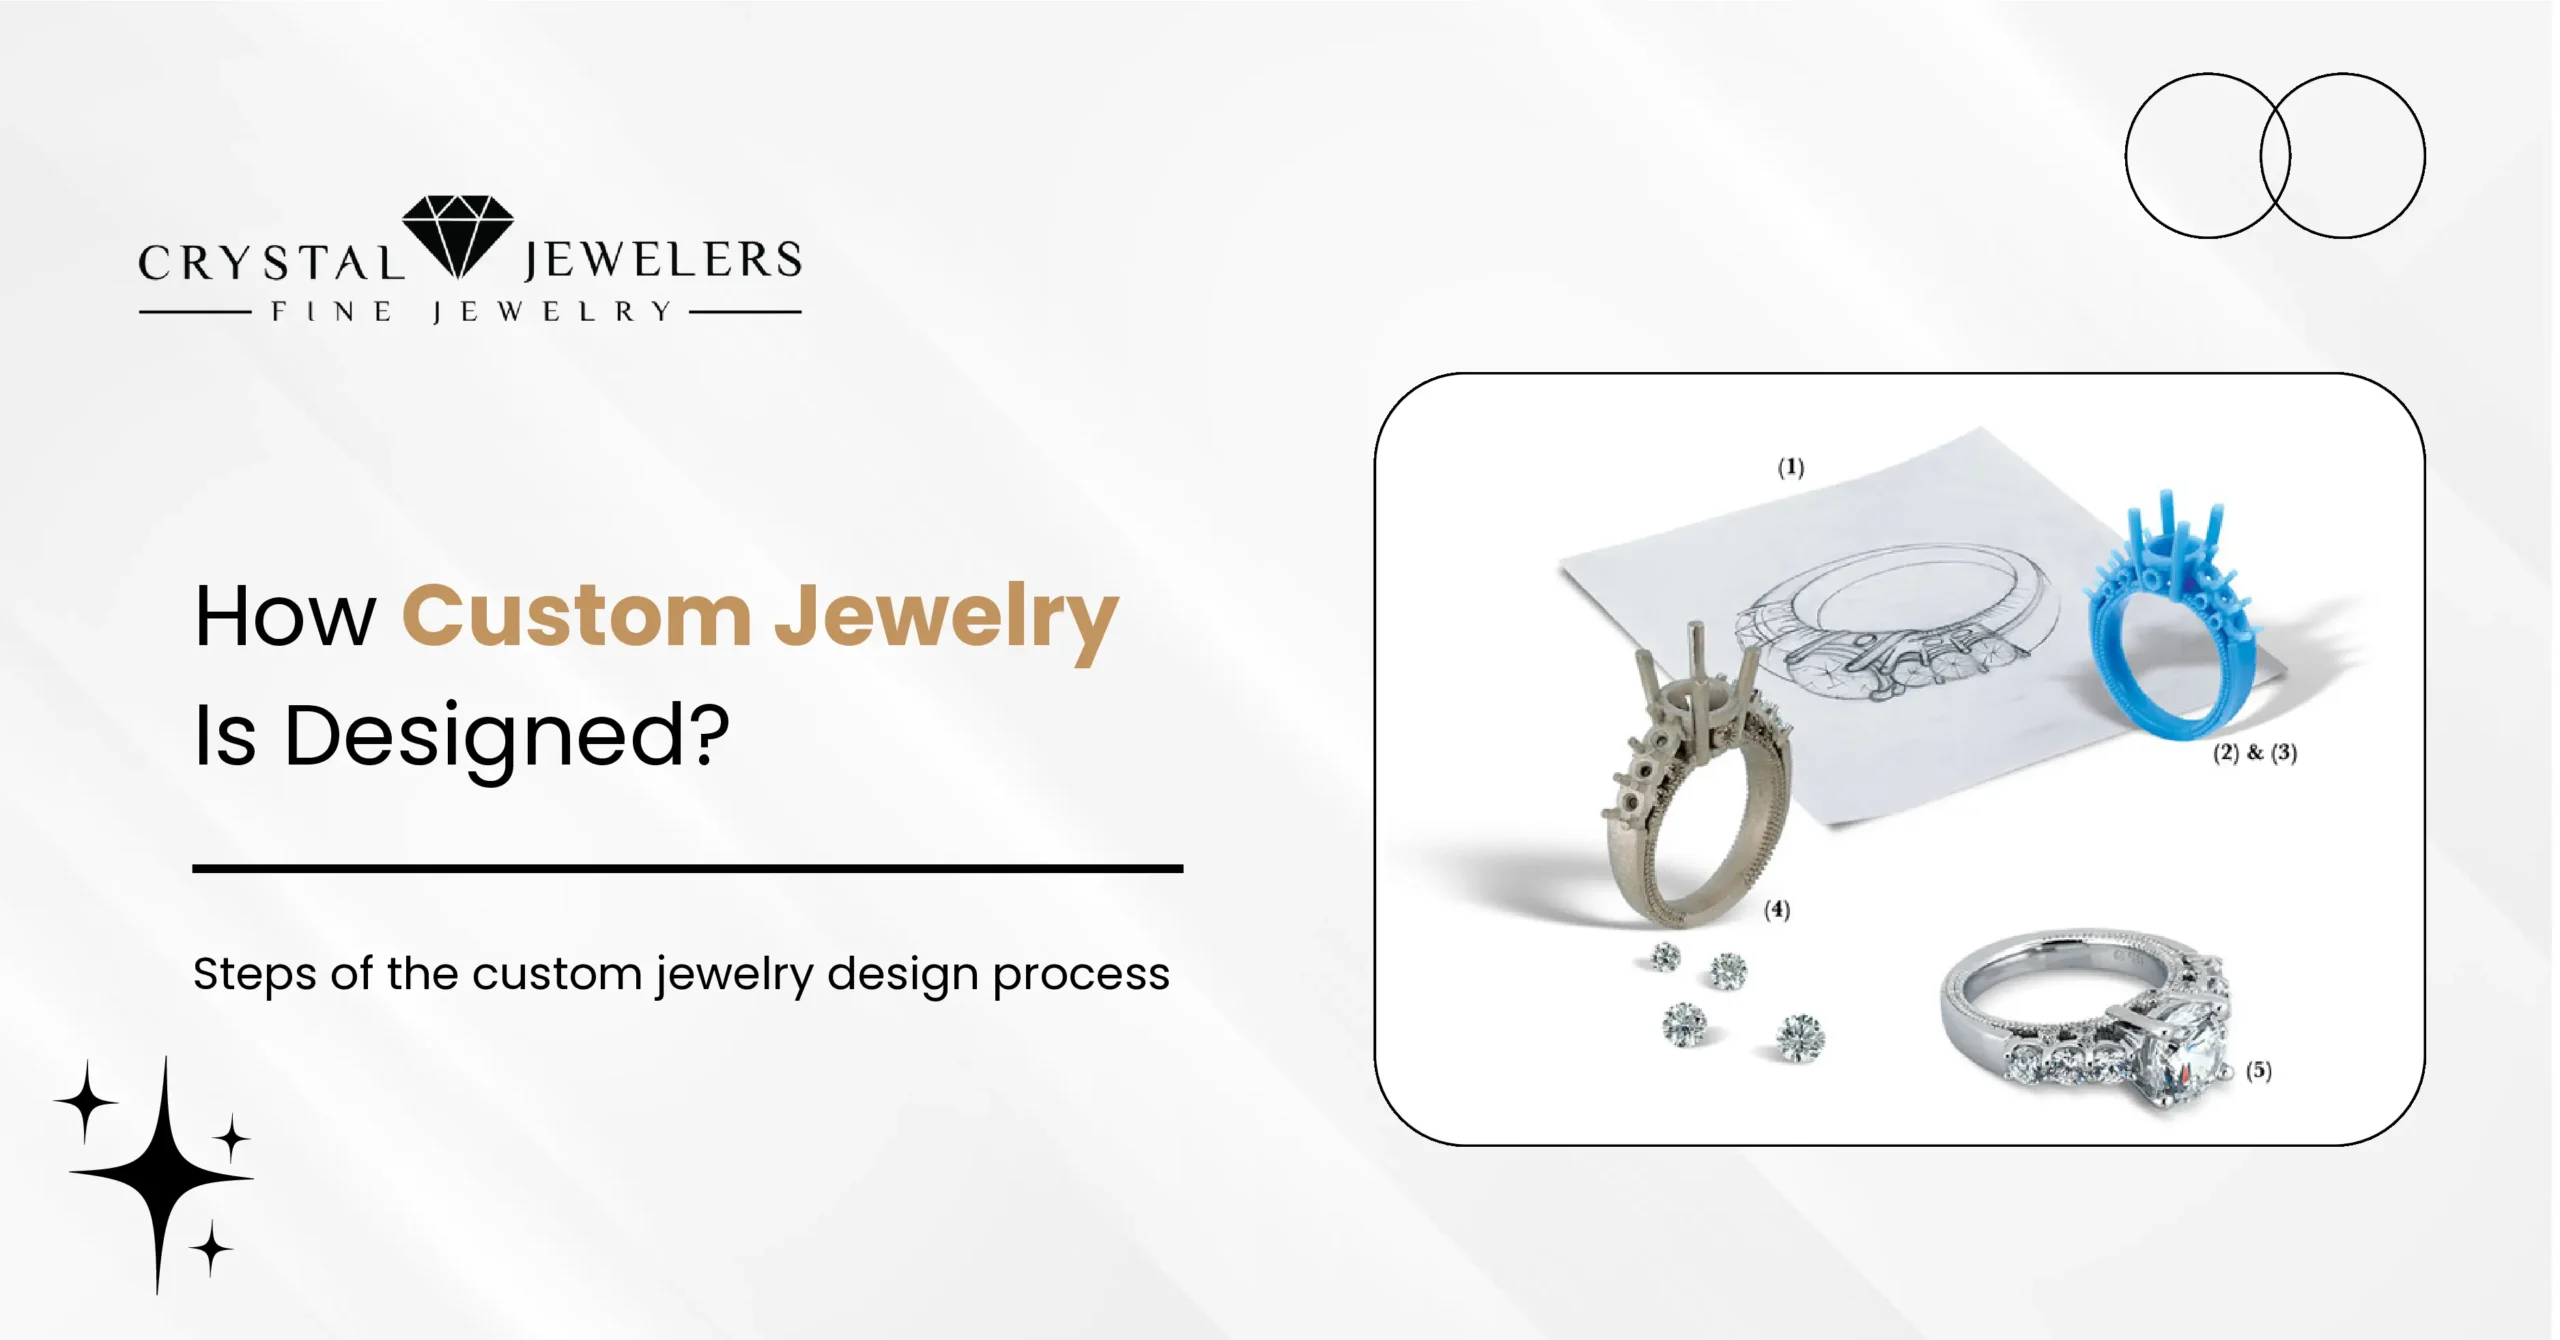
How is Custom Jewelry Designed Step by Step?
More people than ever are choosing custom jewelry over off-the-shelf pieces, and it is easy to understand why.
A custom piece is not just jewelry. It is a story. It reflects your relationship, your personality, and something no one else in the world will own in quite the same way.
But most people have no idea how custom jewelry is designed. The process feels mysterious, and that uncertainty keeps some buyers from ever starting.
This guide removes that mystery completely.
You will learn every step of the custom jewelry design process, from the first conversation to the moment you open the box. Whether you are planning a custom engagement ring, a meaningful gift, or something entirely your own, this guide gives you the confidence to start.
Step 1: Initial Consultation and Idea Discussion
Every custom piece starts with a conversation.
Understanding the Customer’s Vision
You do not need to walk in with a finished plan. Most people come with a feeling, a photo, a vague idea, or just a sense of what they do not want.
A skilled jeweler helps you shape that into something real. They ask about:
- Inspiration: A photo you saved, a piece you once saw, an emotion tied to a moment
- Occasion: An engagement, anniversary, birthday, or personal milestone
- Style: Modern and minimal, vintage and ornate, bold and dramatic, soft and delicate
The more you share, the better the result. Do not hold back on details.
Budget and Timeline Discussion
This part of the conversation matters just as much as the design itself.
A good jeweler helps you understand what is possible at your price point. They do not push you to overspend. They suggest the best materials and stone options that deliver the most value within what you are comfortable spending.
The timeline is also set here. Custom work takes time. Starting this conversation early saves stress later.
Step 2: Concept Development
Once the jeweler understands your vision, the creative work begins.
Translating Ideas Into Design Direction
The jeweler takes your inspiration and begins exploring design possibilities. This might include looking at different silhouettes, proportions, and structural approaches.
At this stage, nothing is locked in. The goal is to find a direction you feel excited about before committing any further.
Stone and Metal Selection
This is where the key material choices happen:
- Stones: Diamonds are the most popular, but sapphires, emeralds, rubies, and other gemstones offer striking alternatives
- Metals: Yellow gold carries a warm, classic feel. White gold is sleek and modern. Platinum is the most durable and has a naturally white color that never fades
- Lab-grown vs. natural diamonds: Lab-grown diamonds look identical to natural ones and cost significantly less, making them a smart option for buyers who want more size or quality for their budget
These choices shape everything that comes next, so taking the time here pays off.
Step 3: Jewelry Sketching
With a clear direction established, the design gets its first visual form.
Hand-Drawn or Digital Sketches
The jeweler creates initial sketches, either by hand or using design software. These are the first real images of what your piece could look like.
You may see several variations at this stage. Each one explores a slightly different take on your concept, letting you compare and react.
Refining the Chosen Concept
Once you identify the direction you love, the sketch gets refined. Proportions are adjusted. Small details are added or removed. The design evolves until you and the jeweler are both satisfied with exactly what it shows.
This approved sketch becomes the blueprint for everything that follows.
Step 4: 3D CAD Design
Modern jewelry design takes the approved sketch into the digital world.
Creating a Digital Model
CAD stands for computer-aided design. Using specialized software, the jeweler builds a precise three-dimensional digital model of your piece.
This is not just a drawing. It is a fully realized model that shows:
- Exact measurements and proportions
- How the stone sits in the setting
- How light interacts with different surfaces
The result is a photorealistic render that gives you a clear preview of the finished piece before any metal is touched.
Client Approval Stage
You review the 3D model from every angle. Top, side, front, and back. You can see exactly how the ring or pendant will look on a hand or neck.
If anything feels off, this is the moment to say so. Adjustments at the digital stage cost nothing. Changes after the metal has been cast cost significantly more.
Only after full approval does the process move forward.
Step 5: Wax Model or Prototype Creation
The approved digital design becomes a physical object for the first time.
Physical Model Production
Using 3D printing technology or traditional wax carving by hand, the jeweler produces a full-scale model of your piece.
This prototype is made from wax or resin, not precious metal. Its purpose is to let you see and hold something that closely mirrors the finished piece in size and shape.
Design Verification
You can try on the wax model. You can check how it feels, how it sits on your finger, and whether the proportions feel right in real life rather than just on a screen.
If anything needs adjusting, now is the time. Once this model is approved, the design moves into permanent production.
Step 6: Metal Casting
With the prototype approved, the jewelry takes its final material form.
Lost-Wax Casting Process
The wax model is placed inside a special container called a flask, which is then filled with a plaster-like material called investment. Once set, the flask is heated in a kiln. The wax melts away completely, leaving a perfect hollow cavity in the exact shape of your piece.
Molten metal is then poured or injected into that cavity under pressure. When it cools, the investment is broken away, revealing a raw metal version of your design.
Choosing the Metal
The metal you selected in the concept stage is cast here. Each option has its character:
- Yellow gold: Warm, rich, and historically beloved
- White gold: Modern, bright, and pairs beautifully with diamonds
- Platinum: Exceptionally durable, heavier than gold, and naturally white
The raw casting comes out rough and unfinished. The next steps transform it into something extraordinary.
Step 7: Stone Setting
This is where the piece truly comes alive.
Selecting and Preparing Gemstones
Each stone used in the piece is carefully selected for consistency in color, cut, and quality. For custom pieces, the stones are often chosen personally to match the design and the buyer’s preferences exactly.
Hand-Setting Techniques
Setting stones by hand requires skill that takes years to develop. The most common techniques include:
- Prong setting: Small metal claws hold the stone in place, maximizing light exposure and brilliance
- Bezel setting: A band of metal wraps around the stone completely, offering a sleek, modern look and extra protection
- Pavé setting: Tiny stones are set closely together on a surface of metal, creating a continuous shimmer of light
Each technique changes the look and feel of the piece. Your jeweler will recommend the one that best suits your design.
Step 8: Polishing and Finishing
The piece now looks like jewelry, but the finishing process is what makes it stunning.
Refining the Surface
The jeweler removes any rough spots, tool marks, or imperfections from the casting. Metal is filed, sanded, and brought to a smooth, consistent surface.
Then comes polishing. Using progressive grits and specialized tools, the surface is brought to a high mirror shine or given a matte, brushed finish depending on your design preference.
Rhodium Plating
If your piece is white gold, it is almost always rhodium-plated at this stage.
Rhodium is a bright white precious metal. A thin layer is applied through an electroplating process, giving white gold its characteristic bright white color and adding a protective surface layer.
Over time, rhodium plating wears and can be reapplied by your jeweler, which is one reason having a trusted local jeweler matters after the sale.
Step 9: Quality Check and Inspection
Before your piece ever leaves the workshop, it goes through a thorough inspection.
Structural Inspection
Every prong is checked to confirm stones are secure. Settings are examined under magnification. The structure of the piece is tested to make sure it will hold up to real-world wear.
Final Quality Control
The piece is compared against the original approved design to confirm every detail matches. Measurements are verified. Surface finish is reviewed under bright light.
Only when everything passes does the piece move to the final stage.
Step 10: Final Presentation and Delivery
This is the moment everything has been building toward.
Packaging the Jewelry
Your finished piece is cleaned one final time, polished to perfection, and placed in luxury presentation packaging. For a custom engagement ring or special gift, this moment matters. The presentation is part of the experience.
Customer Reveal
Seeing your custom piece for the first time is genuinely moving for most people.
You described an idea. A jeweler listened, sketched, modeled, cast, set, and polished that idea into something real. Holding it for the first time, knowing it exists nowhere else in the world, is a feeling that factory-produced jewelry simply cannot match.
How Long Does Custom Jewelry Take?
Average Timeline Breakdown
The full process typically runs between four and eight weeks from the first consultation to delivery. Here is a rough breakdown:
- Design stage (consultation, sketching, CAD): 1 to 2 weeks
- Production stage (prototype, casting, setting): 2 to 4 weeks
- Finishing stage (polishing, inspection, packaging): 1 to 2 weeks
Factors That Affect Timing
Several things can shorten or extend this timeline:
- Design complexity: Simple designs move faster. Highly detailed or multi-stone pieces take more time
- Stone sourcing: Rare or specialty stones may need to be ordered and can add time
- Revision rounds: More changes during the design phase mean a longer design stage
- Holidays and peak seasons: Plan if you need a piece for a specific date
If you have a firm deadline, share it at your first consultation. A good jeweler will plan the process around it.
Benefits of Custom Jewelry Design
Unique and One-of-a-Kind Pieces
No one else will own exactly what you have. That alone makes custom jewelry deeply special.
Full Creative Control
You choose the stone, the metal, the setting style, the proportions, and the details. Nothing is selected for you by a factory floor.
Better Sentimental Value
A piece designed around your relationship, your story, or your loved one carries meaning that store-bought jewelry simply cannot replicate.
Higher Quality Results
Custom jewelry made by skilled jewelers is built to last. Every element is chosen with intention. Every joint and setting is crafted with care. The result is a piece built to be worn and loved for a lifetime.
Common Mistakes to Avoid in Custom Jewelry Design
Not Setting a Clear Budget
Without a number in mind, the process can drift in directions that feel exciting in the moment but lead to regret later. Know your budget and share it honestly from the start.
Changing the Design Too Late in the Process
Changes before CAD approval cost nothing. Changes after casting can be expensive and time-consuming. Make your decisions carefully during the early stages.
Ignoring Practicality and Comfort
A beautiful design that is uncomfortable to wear is not a good piece. Think about how the jewelry will feel during real life. Your jeweler can help you balance visual impact with everyday wearability.
Choosing Low-Quality Materials
Saving money on metal quality or skipping certified stones cuts corners that will show over time. Invest in materials that will hold their quality for years.
Conclusion
Understanding how custom jewelry is designed makes the whole process far less intimidating and far more exciting.
From your first conversation through sketching, 3D modeling, casting, stone setting, and final polishing, every step exists to turn your vision into something real and lasting.
Custom jewelry is not just for special occasions. It is for anyone who wants something made exactly for them, built to last, and unlike anything else in the world.
If you are ready to start, visit Crystal Jewelers in Greensboro, NC. Our team will walk you through every step, help you make confident decisions, and craft a piece you will treasure for life.
Frequently Asked Questions
Is custom jewelry more expensive?
Custom jewelry can cost more than mass-produced pieces, but not always. Because you are choosing exactly what goes into your piece, you can control the cost at every step. Many customers find they get more value from a custom piece than a comparable store-bought one.
Can I design my own engagement ring?
Yes. This is one of the most popular reasons people choose the custom route. You can be as involved as you want, from choosing every detail yourself to simply sharing an inspiration photo and letting the jeweler guide the rest.
How long does custom jewelry take to make?
Most custom pieces take between four and eight weeks from start to delivery. Complex designs or specialty stones can take longer. Start early if you have a specific date in mind.
Do I need to know jewelry design before ordering?
Not at all. You do not need any design knowledge or technical vocabulary. A great jeweler translates your ideas and preferences into a finished piece. All you need is a sense of what you love.
Can I use my own gemstones in custom jewelry?
In most cases, yes. Bringing a family stone, an inherited diamond, or a gemstone you already own and having it reset into a new custom design is a beautiful option. Your jeweler will assess the stone and design around it.
Will I see a preview before it's made?
Yes. The 3D CAD model and rendered images give you a realistic preview from every angle before any metal is touched. You approve the design before production begins.